Friday, March 9, 2012

Sister/Cousin

My cousin and I are very much alike. We like to tell people we got a lot of the same genes. We both love crafting, we like the same colors. We often have the same ideas. We are so much like sisters, our voices even sound alike and our laugh is very similar. My cousin lives in Rathdrum Idaho. I live in Tumwater WA.

 So anyhoo,  I wanted to make something for my cousin to remind her that I miss her and think about her often.

  Lately, I have noticed so many projects on Pinterest that use maps. I wanted to make something with a map to show how we are tied together even though we live far apart. Tumwater Washington isn't really very far away from Rathdrum Idaho.
(on a map anyway)

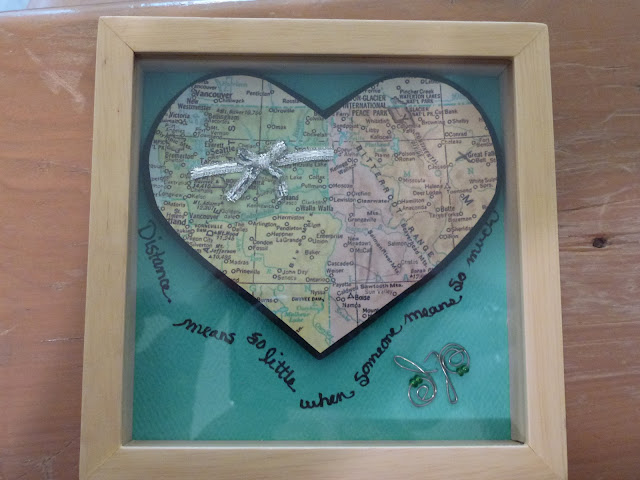
I found an old atlas and made a color copy of a map on my printer. You could use the original map page but I decided I might want to make something else from these atlas pages later, plus I have a hard time cutting up perfectly good books. I cut out a heart shape around the two cities and then cut a slightly larger black heart to frame it. 
 I made small slits with an xacto knife in the paper at approximately the location of Tumwater and one at Rathdrum.  I cut a small piece of silvery ribbon and used the xacto knife to gently push the ribbon through the slits.  I glued the ends of the ribbon to the back of the paper heart with hot glue.  I then tied another piece of ribbon into a small bow and glued it on.
 Connecting us through the miles! Awww.

 Another idea would be to glue a heart shape or a car etc. I had also thought of sewing a "road" between the two places. I chose ribbon because it is such a short distance and the thread and yarn I tried at first wasn't very noticeable with such a short distance.Now, if you were connecting, say California and New York, that is a different story! I would sew a red road with embroidery floss or something like that.
 Now, I could have just used my computer to print out perfect lettering for the saying, but I wanted to write in my hand writing to make it personal. You may not believe it, but your handwriting is precious to your friends and loved ones.  We don't write much anymore and I think that is sad.

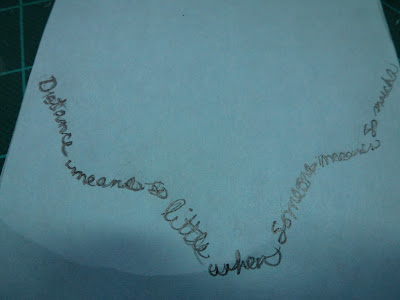
To get the lettering right on the first try, I first cut out a practice page the same size as my project paper. I used some printer paper that I had lying around.
Here is an old fashioned trick I learned a long time ago in college. (before home computers) First, count the letters and spaces in the sentence. Divide the number by 2. Now at the halfway mark of the space you are going to place the words, start the second half of the sentence being careful to fit it in to half the total space. Then start the beginning of the sentence and be mindful to fit it into the space left between the beginning and the midpoint. I hope that makes sense.  Maybe someday I will do a video tutorial for it. People ask me how to do this all the time. 
 I then used the old tried and true technique of using the side of a pencil to cover the back of the paper (under the words) with graphite to make a sort of "carbon copy". Wow, I'm not sure people still know what that is.  I guess I'm showing my age in this post! This is a good technique to know. I have used it in many situations when there wasn't an easier or quicker way of copying something.

 So, I placed the graphite copy over my project paper and wrote over the words that were already written on the paper. This transferred some of the graphite  to my project paper. It was enough of a copy so that I could see where the words started and ended. I then took a deep breath and wrote in a slow, careful hand on the project paper with a Sharpie. Next, I erased the graphite marks.  I have learned that Sharpie markers don't smear even when erasing, unlike some other pens that shall remain nameless. Ahem.

I then glued a piece of felt to the back of the heart shape to raise it off the paper a bit. You could also use cardboard pieces, foam pieces etc. Anything to raise the shape off the paper to make it more noticeable.Finally, I glued the heart onto the paper.


Please forgive this photograph. The glass doesn't come out of this frame so I had to photograph it through the glass which caused some weird reflections. I thought it needed a little something so I glued some wire initials onto the corner. d for Dana and p for Pam. Our middle name is the same by the way. We are sister/cousins.

I would love to see what fabulous crafts you come up with using maps. I love comments and will answer every single one!
laurieslittlebitsofcreativityetc

Monday, March 5, 2012

Valentine's Day is gone, but will you still be mine?

Like I have said before, winter around here is brutal in the sense of constant clouds and rain and drizzle and clouds, well you see where I'm going with this.
I guess I need to give myself an excuse for not completing these Valentines in time for Valentine's Day 2012. What I'm saying is that I was too lazy and hibernatey to get them done. Okay? I choose to look at it this way, I will have lots of great gifts for Valentine's Day 2013! The way we look at things determines so much in our lives, don't you think?

In my last blog I hinted that I would share the projects I made from the hearts I bought at Target's Christmas clearance sale.

They were 90 percent off! I bought them for 10 cents each. 3 felt hearts for 10 cents. That makes them 3.33 cents per heart.  Unfathomable!

So, I finally got down to business. I decided to use only supplies I already had on hand. Like most crafters, over the years, I have collected lots of odds and ends. Since these hearts were so economical, it is fitting that the projects remain very cheap to make. Here are some things I have been working on.

First,I thought I would try a classic Valentine project. I just used baker's twine and added some white felt hearts I cut out and glued to the string. Pretty standard crafting techniques. Forgive my photography.  I took these photos at night in my craft room.  It wouldn't have mattered much if I had waited for daylight. It has been pretty dark around here during daylight hours! But alas, spring is coming!


So, next I thought of making some garlands out of multiple hearts.


I started out tying the hearts together with baker's twine.  I love that stuff. It is so trendy right now. To connect the hearts together I looped a long piece of baker's twine through one of the decorative spaces. I cut a separate piece of twine and wound it around and around...
 until I had wound it all. I used a very small amount of hot glue at the ends.
 Then I cut the short end of the connecting twine off. Voila!
I used crepe paper streamer roses in the middle where the original hole is in each heart. If you don't know how to make crepe paper  flowers, you can find many tutorials. Google crepe paper rose tutorial. Or if you choose, use a different search engine. On Pinterest, searching for paper roses will bring up some interesting and varied examples.
 Tada. The final garland. Other ideas? I added more roses in between the hearts on another garland I made for my cousin. But you get the idea. 

The next one is my favorite. At least today it is my favorite. I used some great ribbon I bought for a wedding shower I threw for a friend last spring.  The words love, cherish, joy are sewn into the ribbon.


I chose the word love to connect the hearts and glued long pieces of the ribbon to the sides of the hearts for hanging. 

 I just looped the ribbon through the decorative spaces on the outer edges and glued the end of the ribbon to the ribbon on the back. I added a black bead I had in my bead stash by gluing it onto the hangy hole at the top. I think I just invented the word hangy.


Another idea? I used some old cotton lace that my mom had in her stash.  I just tied the lace into bows to connect the hearts and glued the ends to long pieces of the lace at either end of the garland. I glued three little pearly beads into the hangy hole space. With any of these ideas, you could just keep adding hearts to make the garland longer. I picture these garlands being hung over windows, on bulletin boards, above doors or on walls.


This next one was kind of out there. I call it My Edgy Valentine. It is put together with wire that I looped around a pen.  I added large pearly beads to connect the hearts together. I think thicker wire would have been more effective. See what you can come up with. 


Last but not least, a Valentine of a different color.  I used pink crepe paper ribbon to make two roses, sandwiched together so this can spin and be the same on both sides. I am thinking about hanging it in a window. I used embroidery floss for the tassel and hanging loop. I used my curling iron to iron out the embroidery floss so it would hang straight. A hair straightening iron would work well also. This one doesn't scream Valentine's day to me so I am going to use it all year around.  I think it would look great sewn or glued to a heart shaped sachet and hung on a hanger in the closet to make clothes smell good.


Thousands of people must have bought these hearts at Target, but even if you didn't get in on this deal, you can build on my ideas or come up with your own ideas. I am thinking it would be great to use felt star shapes to make a 4th of July banner.  I saw some four  leaf clovers made of foam at the Dollar Tree and I am thinking of making a garland out of those for my fireplace. You might see it on my next post. Other possibilities include buttons, ribbon flowers, origami etc. etc.

Please share all of the projects you come up with.  I would love to see them.  Or just stop by to chat. I love comments and will answer them. I would like to join in on other blogs.  I am new to the wide, wide world of blogging and I'm excited to see where this whole experience will take me.

Saturday, February 25, 2012

Pinterest Saved Me (from complete hibernation)


This is probably a weird way to start a blog but I must  say, I typically have a hard time getting through the winter months. I live in a very rainy, cloudy part of the USA and dread the winter, particularly February.    Ugh   Well, good news! This year during the season of hibernation, I found the world of fabulous crafty wonderfulness they call pinterest.com

The recipes, craft ideas, dreamy plans for spring and summer and party planning posts I have come across have given me a new lease on life and a can do attitude. The ideas, links, photos, tutorials etc. etc. etc. are enough to make one giddy with excitement.  I don't know what it is about it but people are starting to refer to the whole Pinterest experience as internet crack.  In other words, Very Addictive!

My fellow Pinterest friends and I chuckle at our common tendency to pin and pin and pin all night yet never make craft one. But I look back now and I realize that over the last few months I have used lots of ideas I found on Pinterest.  Plus, I now think twice about throwing away even the most mundane items, like toilet paper rolls.  My mother would be appalled, but hey, that is a subject for another blog day.

I think my first fabulous find from Pinterest was the idea for these cupcakes for my friend Mary Anne's 50th birthday party.  The theme was "Life's a Beach!" I believe the original idea came from www.bettycrocker.com

There are many examples on Pinterest. Type beach cupcake into the search box and lots of very cute cupcake examples pop up.  See the bikini clad Teddy Graham bathing beauty lying on her fruit stripe gum beach towel?  Do you know how hard it was to find Fruit Stripe gum?!?  We uses Gummy Lifesavers for life rings and added Swedish fish of course.  The sand was organic brown sugar.  We also used Annie's Chocolate and whole wheat Bunny crackers and stuck them in the water and on the beaches. (beach bunnies  hee hee) My friend Holly made the palm trees out of Tootsie Rolls and Wilton's candy melts.  We had to put toothpicks in the palm tree trunks because they kept falling over.  Lessons learned...

Next, I made and pinned this idea for Ground Hog's Day cupcakes since my husband was born on Ground Hog's Day. 
this photo was taken before I added the "dirt" which was really chocolate wafer crumbs. 

 I found the original idea on Google Images. 

Next, I found out via Pinterest that those Magic Eraser Sponges are just Melamine Foam and can be ordered from Amazon.com or eBay. 30 sponges for about $6.00! Wow, who knew?  

Back in January, I hit the clearance jack pot at Target.  All of the Christmas merchandise was 90% off.  I grabbed a ton of these heart ornaments. I thought, "Wow, these will make great (and cheap economical) Valentine's Day gifts."  They were originally $1.00 for 3 felt hearts in wonderful colors.  I couldn't believe it.  10 cents?  I can't remember the last time I bought something for 10 cents.  I think Pinterest has inspired me to imagine new and fabulous ways in which to be crafty.  I feel a new confidence.  It turns out that pinning all of those ideas really was worthwhile.  In the grand scheme of things, all of that time I thought I was wasting has really paid off.  So, please tune in next time to see what I made with these felt Target hearts.    

And,  if you haven't already, check out Pinterest and pin away.  11 million pinners can't be wrong!